DIY Rustic TV Stand
Don't forget to stop by and Like my Facebook Page! DIY Vintage Chic.

Download link at bottom of page for instructions.
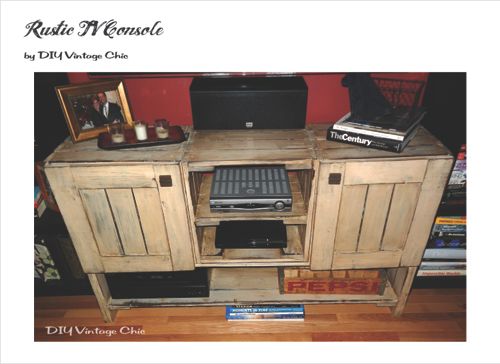
Finally! About a year ago I started this project and have started and stopped several times. But finally, through the 20º and 30º weather I stood out in our garage and completed the console! Originally I started off with the idea of using a pallet but discovered 1) those boards are hard to pull off 2) they weren't long enough and 3) I was afraid they weren't thick enough to old the weight of the tv. But this was the idea that started it all. Before you ask, I'm trying to pull together better directions.
 I finished the center "crate" first. I wanted to keep the crate theme to go along with the Crate Coffee Table.
 This photo here was a big stopping point for me. I had finished the build and then started working on the paint and stain but didn't like the outcome. Eventually I sanded down the entire thing and basically started over. I used the same technique I used in the shelf of my window treatment. Dry brushed some white paint, sanded down the edges and stained over the paint.
 The hubby and the table saw he got me for Christmas helped me out with the doors!
 He cut a slot in the top and bottom boards of the door frame for us to slide 1/4" boards into.
 Better directions are coming but I slid the 1/4" boards into the top and bottom boards of the door frame.
 And screwed the frame into place.
 Doors painted, sanded and stained
 Here's the hubby getting rid of our old tv stand. (Please ignore all the dust.) And also enjoying a couple glasses of vino! ;)
 So there are several running stories about how our place is haunted. Lots of fishy incidents around our place that we can't explain. So please notice the top left corner of the pic below, the giant orb (there's actually 2 more that I cropped out).... I took several pictures from the same spot all within a minute or two of each other and this is the only one with the orbs. You can gather your own thoughts about that.

 I wanted a place to store our DVDs and games and not have them falling all over the place.


 DOWNLOAD HERE!
Thanks for stopping by!

Check out who I've linked up with this week by going to my Linky Party Page!
Download link at bottom of page for instructions.
Finally! About a year ago I started this project and have started and stopped several times. But finally, through the 20º and 30º weather I stood out in our garage and completed the console! Originally I started off with the idea of using a pallet but discovered 1) those boards are hard to pull off 2) they weren't long enough and 3) I was afraid they weren't thick enough to old the weight of the tv. But this was the idea that started it all. Before you ask, I'm trying to pull together better directions.
Thanks for stopping by!

Check out who I've linked up with this week by going to my Linky Party Page!
***While I'm thrilled to share my step-by-step directions, the good and the bad, these are intended for your personal use. I'm always happy to hear and see what my bloggers have been working on. BUT a lot of work goes into these creations and while I have no issues sharing so you are able to create the work for your precious homes please understand that selling an exact duplication of my designs is highly frowned upon. :( Please always be considerate of another artists work. Thank you!***


Wow...I really love this--it is rustic but soo cute. When I see a project like this it is so inspiring to try (I am glad you stuck with this one:) pinning to try (someday). found at cast party wed. Have a great week!
ReplyDeleteThanks Rachel! Good luck (someday) ;)
DeleteThis looks awesome, great job! And thanks for the info on how you were able to get the nice finish.
ReplyDelete