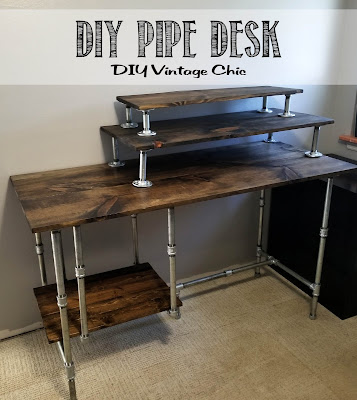
DIY Industrial Standing Desk
Don't forget to stop by and Like my Facebook Page and Follow me on Twitter!
Happy New Year! Welcome to 2019!!! Yes, I realize it's already mid-June but this is the first time I've post in over a year!!! :/ Yikes. The past year has kept me away from the shop but I finally made some time and room for my new standing desk.
Unfortunately, I rushed to complete the project so I don't have any "in the making" photos. But I had fun and it was exciting to get back to work.
For the past few years since I've wanted to build a standing desk for myself. When I started working from home I made this makeshift desk in our guest bedroom. I threw a few pieces of MDF and 2x4s together on top of this large window ledge. It served it's purpose however the window behind my screens made it hard to see and I was often squinting because of the sunlight coming in.
I bought the hardware store out of about all their pipe fittings and got to work in the garage. Our newest furbaby to join the family, Goose, decided she would help me.
But then she was distracted by neighbors and a bird or two.
And when that was too exhausting, she took a nap.... completely in my way
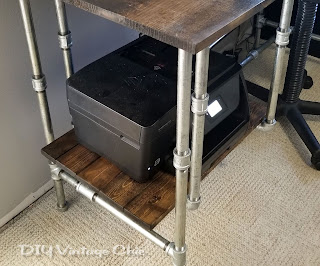
Here is the base layer of the desk along with the hanging printer stand.
And here are the top two levels added. For the time being, I've kept them all as separate pieces.
With the new desk, I can stand and work or move the wireless keyboard and mouse down to the base of the desk and sit. Perfect for whatever mood I'm in.
The printer shelf hides below the desk but still allows enough room for me to open the scanner lid.
And now, with the desk moved away from the window I can open the blinds and actually enjoy the sunlight!
Thanks for stopping by!

Check out who I've linked up with this week by going to my Linky Party Page!
Happy New Year! Welcome to 2019!!! Yes, I realize it's already mid-June but this is the first time I've post in over a year!!! :/ Yikes. The past year has kept me away from the shop but I finally made some time and room for my new standing desk.
Unfortunately, I rushed to complete the project so I don't have any "in the making" photos. But I had fun and it was exciting to get back to work.
For the past few years since I've wanted to build a standing desk for myself. When I started working from home I made this makeshift desk in our guest bedroom. I threw a few pieces of MDF and 2x4s together on top of this large window ledge. It served it's purpose however the window behind my screens made it hard to see and I was often squinting because of the sunlight coming in.
I bought the hardware store out of about all their pipe fittings and got to work in the garage. Our newest furbaby to join the family, Goose, decided she would help me.
But then she was distracted by neighbors and a bird or two.
And when that was too exhausting, she took a nap.... completely in my way
Here is the base layer of the desk along with the hanging printer stand.
And here are the top two levels added. For the time being, I've kept them all as separate pieces.
With the new desk, I can stand and work or move the wireless keyboard and mouse down to the base of the desk and sit. Perfect for whatever mood I'm in.
The printer shelf hides below the desk but still allows enough room for me to open the scanner lid.
And now, with the desk moved away from the window I can open the blinds and actually enjoy the sunlight!
Thanks for stopping by!
Check out who I've linked up with this week by going to my Linky Party Page!
***While I'm thrilled to share my step-by-step directions, the good and the bad, these are intended for your personal use. I'm always happy to hear and see what my bloggers have been working on. BUT a lot of work goes into these creations and while I have no issues sharing so you are able to create the work for your precious homes please understand that selling an exact duplication of my designs is highly frowned upon. :( Please always be considerate of another artists work. Thank you!***


Comments
Post a Comment
Thanks for stopping by DIY Vintage Chic! I appreciate your time and comments. If you have any direct comments please let me know. Feel free to comment, use my contact page or Facebook. See ya soon!